When working with Celestix Forefront MSA/WSA Appliances you may have to reinstall the Appliance with the default TMG/UAG-Image at some point. It is really easy to reset the Appliance after having followed the various steps as described in the userguide. The image is then reinstalled on the hardware and several actions will take place to finish the appliance setup thereafter. Some basic initialization tasks take place after the image is copied to the hardware which actually is the core set up of the machine. Some auto-admin-logon tasks start and several vbscripts run during the post installation phase. At this point you might experience a problem that the vbscript does not stop running. The script hangs and nothing more happens. The Appliance fails to reinitialize and all the features, including the typical first-start wizards of TMG/UAG will fail. If you compare the intructions in the Celestix userguide you won´t see any mistakes you may have made. The solution to the problem is that the network interfaces eth0 and eth1 need to have a physical link to run the initialization scripts. There is no documentation about this prerequisit. Hence, you simply need to crossover these two ports or link them to a switch and the reset process will run properly. Celestix has been informed about this documentation issue and I hope they will add this missing information as soon as possible to their Appliance userguide.
Dienstag, 5. Oktober 2010
Donnerstag, 30. September 2010
Microsoft Forefront UAG Administrators Handbook
A new book is available for peope interested in configuring and administering the Microsoft Forefront UAG 2010. The book is written for Networking and Security Engineers who are intended to integrate UAG in the corporate network. For more information and details click here.
Microsoft Forefront UAG in Common Criteria Evaluation
Microsoft Forefront UAG has formally entered evaluation for Common Criteria Evaluation Assurance Level 2+ with TÜViT as the testing laboratory and is listed in the Evaluated Product List on the BSI website. For more information you can read this blog and you can find the Evaluated Product List here.
Samstag, 25. Oktober 2008
How to configure IAG to use ADAM as a custom Repository
Here are the steps for configuring Intelligent Application Gateway (IAG) to use an Active Directory Application Mode (ADAM) instance for user authentication. An how-to on configuring ADAM can be found here in this blog.
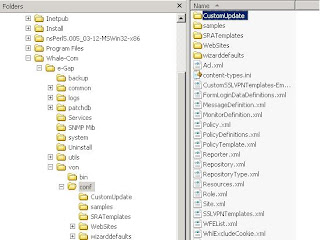


All authentication providers IAG uses are defined in a file named RepositoryType.xml. This file can be used as a blueprint for the additional RepositoryType.xml file we create - or you simply use my file as a reference to build your custom repository. In order to get our customizations independent of any updates made to IAG during Servicepack or Hotfix installations we create a folder named CustomUpdate under \Whale-Com\e-Gap\von\conf as you can see in the screenshot:
Then we copy the RepositoryType.xml from the conf folder to the CustomUpdate folder. You can delete all content in the file except the repository for Active Directory or you create a blank RepositoryType.xml and copy in the content of this post. The content of the file for cut and paste can be found here. The following screenshot shows the content in Notepad:


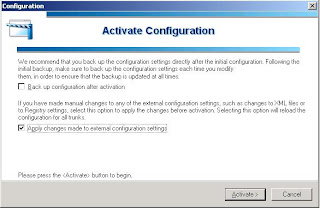
After we created the xml file in the right place we have to commit the configuration changes within the IAG Configuration Application. Make sure the checkbox "Apply changes made to external configuration settings" is checked.
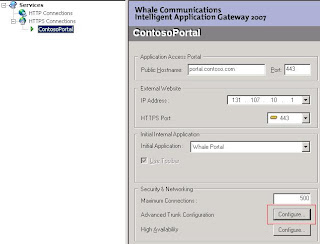
Now we are ready to configure our portal to accept logins from users stored in ADAM. To allow them to log in expand HTTPS Connections and click on you portal. From there click on the Configure button near Advanced Trunk Configuration to open your portals configuration page.

Now we are ready to configure our portal to accept logins from users stored in ADAM. To allow them to log in expand HTTPS Connections and click on you portal. From there click on the Configure button near Advanced Trunk Configuration to open your portals configuration page.

On the Advanced Trunk Configuration Page click the Authentication Tab and click the Add button.

In the Authentication and User/Group Server click Add

In the Add Server Dialog enter the values for your ADAM Instance and the username and password for the user you configured for read access within you adam instance. If you do not want to login with the full dustinguishedName of the user you can fill out the userPrincipalName Attribute of the account. Then the users UPN can be used on the Add Server Dialog and for portal login.

Assuming you have configured your ADAM Instance correctly the Add Server Dialog will close and a new selectable authentication provider is in the list of possible sources on the Authentication and User/Group Server Dialog. Click the Select button and we are nearly at the end of the story.

Now we can create a new application in our portal. In my case i generated a new generic web application pointing to a Sharepoint Site configured to be an extended Site of an existing Intranet Site but located in the Extranet Zone and configured to use forms-based authentication against my Contos Demo ADAM Repository. In ADAM i created a group called Sharepoint. Thus we can security-trim the published Sharepoint Application only to be accessible for members of the Sharepoint Group. To do this, complete the add application wizard and enter the required information there. After completing the wizard edit the created application and select the Authorization Tab of the applications porperty window. Clear the All users are authorized checkbox.

Click the Add button and select the newly created ADAM Repository in the Select Users or Groups Window. Search for the group you created in your ADAM Instance and add the group by clicking the Add button

Click OK twice and activate your configuration. When the configuration activation has finished, you are able to logon to the portal with an account stored in ADAM and you will see the published application if you are a member of the Sharepoint group.
Freitag, 24. Oktober 2008
How to set up Active Directory Application Mode (ADAM) for use with IAG
Here are the steps to set up and configure your ADAM Instance to get it working with Microsoft IAG:
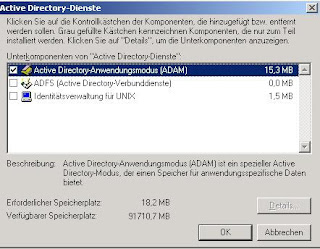
First you have to set up the components using Add/Remove Programs - Add/Remove Windows Components - Active Directory Services - Active Directory Application Mode (ADAM)
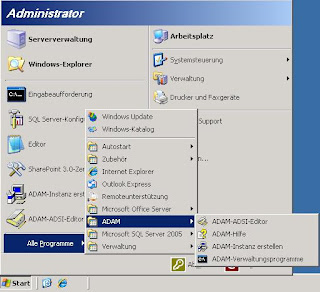
After the setup has finished you will find a new program group named ADAM under All Programs:
Define the ports for unencrypted and encrypted LDAP connections. To use encrypted LDAP connections or LDAPS you have to issue a server authentication certificate for the service running your instance


Select a location where you like to store your instance data

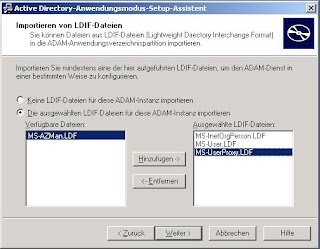
Now you have to select the the ldif-files for schema import. The three ones selected in the screenshot are enough in this scenario
After clicking next two or three times more the creation of your directory will start, the schema files are imported and the service is started. Now you are ready to use your instance.
When the installation is finished you can find the ADSI-ADAM-Editor Tool within the ADAM Program Group created during the installation. You are using this tool to create users, groups, ou´s and to fill out the properties you need. The first thing that needs to be done is to establish a connection to your fresh installed LDAP Directory. Therefore you create your connection like the screenshot shows by right clicking the top node and select connection:


The next step is to enable read access on the directory for your created user. In ADSI-ADAM you can see a node called CN=Roles. You can find three predefined groups named Administrators, Readers and Users. To give read access to our created user we need to right click the group named readers and select the property member. Click edit to open the membership window for that group. Enter the full distinguishedName of the user object you like to put in.
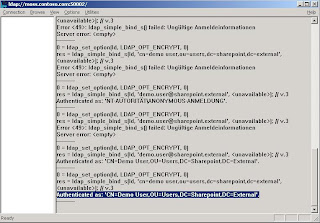
ADAM by default is configured to only allow secure connections. For interaction with IAG authentication we connect to the ADAM instance using the simple bind method. You should think about securing this communication, that means encrypting using IPSec. To test that simple bind will NOT work out-of-the-box you can use ldp.exe which can be startet through the ADAM Command Prompt in the ADAM Program Group. As you can see unencrypted authentication is disabled by default.
Mind the message about simple bind in the lower end of the ldp tool. To enable simple bind you have to use the ADAM Command Console using the dsmgmt command. Very simmilar to ntdsutil you configure the ds behavior to allow password operations on unsecure connections. The following screen shows you the exact commands in dsmgmt.
After configuring the ADAM instance you are able to bind to the directory using simple bind.
Everything is done so far. You can additionally create a group, for example Sharepoint in the same way you created a user or an ou. In the value for the group-type enter 2147483650. Adding users to the group can be done in the same way you added the demo user to the Readers group for ADAM instance reader access. Select the member attribute of the group an add the user using the distinguishedName of the user object. We can continue with our work in IAG now.
First you have to set up the components using Add/Remove Programs - Add/Remove Windows Components - Active Directory Services - Active Directory Application Mode (ADAM)

After the setup has finished you will find a new program group named ADAM under All Programs:

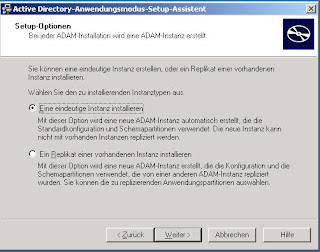
Now you can start creating your instance using the wizard Create ADAM Instance. After the Welcome Screen select Create a Unique Instance:
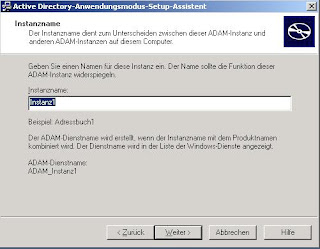
For the instance name choose any name you like - you can identify your instance after finishing the wizard in services.msc

For the instance name choose any name you like - you can identify your instance after finishing the wizard in services.msc

Define the ports for unencrypted and encrypted LDAP connections. To use encrypted LDAP connections or LDAPS you have to issue a server authentication certificate for the service running your instance

On the next screen you configure the entry point of your LDAP Directory to store individual data. I recommend you to use an entry point like dc=,dc=, for example dc=contoso,dc=local to be able to create OU´s underneath your directory structure

Select a location where you like to store your instance data

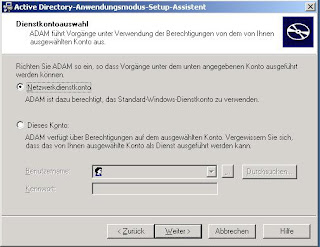
Choose a service account under which your instance will run. I prefer to use the network service to achieve a minimum of required permissions

Now you have to select the the ldif-files for schema import. The three ones selected in the screenshot are enough in this scenario

After clicking next two or three times more the creation of your directory will start, the schema files are imported and the service is started. Now you are ready to use your instance.
When the installation is finished you can find the ADSI-ADAM-Editor Tool within the ADAM Program Group created during the installation. You are using this tool to create users, groups, ou´s and to fill out the properties you need. The first thing that needs to be done is to establish a connection to your fresh installed LDAP Directory. Therefore you create your connection like the screenshot shows by right clicking the top node and select connection:

When you are connected you are able to create an ou by right clicking your LDAP structure and selecting New --> Object and click organizationalUnit. In the following dialog enter the name of your ou and click finish. This procedure may look something like this:

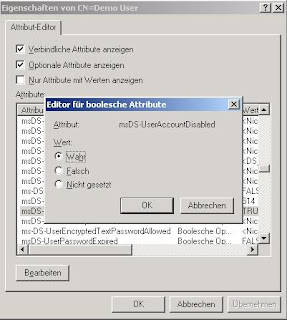
In the same way you can create user accounts in your ou. Right click the ou and select New --> Object --> user. Fill in the name for example Demo User, click next and finish. The user object is created but disabled. The account policies for the server you are running ADAM on need to be achieved. After you set a password in compliance with your password policies you can enable the user account. To set the password you just need to right click the user object and select Reset Password. To enable the user right click the user object and select properties and search for the attribute named msDS-UserAccountDisabled. Doubleclick the property and set the value to false.


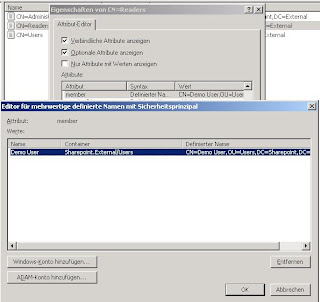
The next step is to enable read access on the directory for your created user. In ADSI-ADAM you can see a node called CN=Roles. You can find three predefined groups named Administrators, Readers and Users. To give read access to our created user we need to right click the group named readers and select the property member. Click edit to open the membership window for that group. Enter the full distinguishedName of the user object you like to put in.

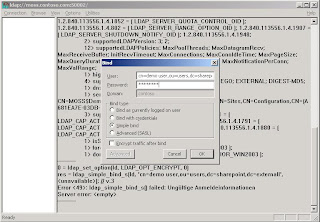
ADAM by default is configured to only allow secure connections. For interaction with IAG authentication we connect to the ADAM instance using the simple bind method. You should think about securing this communication, that means encrypting using IPSec. To test that simple bind will NOT work out-of-the-box you can use ldp.exe which can be startet through the ADAM Command Prompt in the ADAM Program Group. As you can see unencrypted authentication is disabled by default.

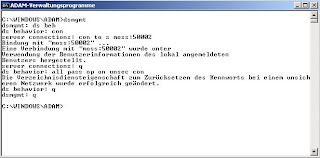
Mind the message about simple bind in the lower end of the ldp tool. To enable simple bind you have to use the ADAM Command Console using the dsmgmt command. Very simmilar to ntdsutil you configure the ds behavior to allow password operations on unsecure connections. The following screen shows you the exact commands in dsmgmt.

After configuring the ADAM instance you are able to bind to the directory using simple bind.

Everything is done so far. You can additionally create a group, for example Sharepoint in the same way you created a user or an ou. In the value for the group-type enter 2147483650. Adding users to the group can be done in the same way you added the demo user to the Readers group for ADAM instance reader access. Select the member attribute of the group an add the user using the distinguishedName of the user object. We can continue with our work in IAG now.
Abonnieren
Posts (Atom)