First you have to set up the components using Add/Remove Programs - Add/Remove Windows Components - Active Directory Services - Active Directory Application Mode (ADAM)

After the setup has finished you will find a new program group named ADAM under All Programs:

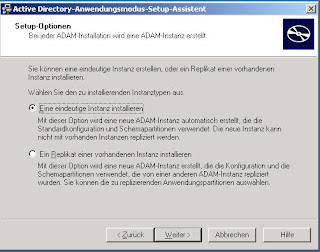
Now you can start creating your instance using the wizard Create ADAM Instance. After the Welcome Screen select Create a Unique Instance:
For the instance name choose any name you like - you can identify your instance after finishing the wizard in services.msc

For the instance name choose any name you like - you can identify your instance after finishing the wizard in services.msc

Define the ports for unencrypted and encrypted LDAP connections. To use encrypted LDAP connections or LDAPS you have to issue a server authentication certificate for the service running your instance

On the next screen you configure the entry point of your LDAP Directory to store individual data. I recommend you to use an entry point like dc=,dc=, for example dc=contoso,dc=local to be able to create OU´s underneath your directory structure

Select a location where you like to store your instance data

Choose a service account under which your instance will run. I prefer to use the network service to achieve a minimum of required permissions

Now you have to select the the ldif-files for schema import. The three ones selected in the screenshot are enough in this scenario

After clicking next two or three times more the creation of your directory will start, the schema files are imported and the service is started. Now you are ready to use your instance.
When the installation is finished you can find the ADSI-ADAM-Editor Tool within the ADAM Program Group created during the installation. You are using this tool to create users, groups, ou´s and to fill out the properties you need. The first thing that needs to be done is to establish a connection to your fresh installed LDAP Directory. Therefore you create your connection like the screenshot shows by right clicking the top node and select connection:

When you are connected you are able to create an ou by right clicking your LDAP structure and selecting New --> Object and click organizationalUnit. In the following dialog enter the name of your ou and click finish. This procedure may look something like this:

In the same way you can create user accounts in your ou. Right click the ou and select New --> Object --> user. Fill in the name for example Demo User, click next and finish. The user object is created but disabled. The account policies for the server you are running ADAM on need to be achieved. After you set a password in compliance with your password policies you can enable the user account. To set the password you just need to right click the user object and select Reset Password. To enable the user right click the user object and select properties and search for the attribute named msDS-UserAccountDisabled. Doubleclick the property and set the value to false.


The next step is to enable read access on the directory for your created user. In ADSI-ADAM you can see a node called CN=Roles. You can find three predefined groups named Administrators, Readers and Users. To give read access to our created user we need to right click the group named readers and select the property member. Click edit to open the membership window for that group. Enter the full distinguishedName of the user object you like to put in.

ADAM by default is configured to only allow secure connections. For interaction with IAG authentication we connect to the ADAM instance using the simple bind method. You should think about securing this communication, that means encrypting using IPSec. To test that simple bind will NOT work out-of-the-box you can use ldp.exe which can be startet through the ADAM Command Prompt in the ADAM Program Group. As you can see unencrypted authentication is disabled by default.

Mind the message about simple bind in the lower end of the ldp tool. To enable simple bind you have to use the ADAM Command Console using the dsmgmt command. Very simmilar to ntdsutil you configure the ds behavior to allow password operations on unsecure connections. The following screen shows you the exact commands in dsmgmt.

After configuring the ADAM instance you are able to bind to the directory using simple bind.

Everything is done so far. You can additionally create a group, for example Sharepoint in the same way you created a user or an ou. In the value for the group-type enter 2147483650. Adding users to the group can be done in the same way you added the demo user to the Readers group for ADAM instance reader access. Select the member attribute of the group an add the user using the distinguishedName of the user object. We can continue with our work in IAG now.
1 Kommentar:
Hi, Andreas,
My name is Ben Ari, and I'm with Microsoft's IAG CSS team. I wanted to tell you that we have opened a public IAG support forum that you might find useful and interesting. Please have a look, and if you are willing to link to it from your blog, I will be more than happy!
http://social.technet.microsoft.com/Forums/en-US/forefrontedgeiag/
thank you,
Ben Ari
Microsoft
Kommentar veröffentlichen